Steps:
1. Start by cutting the cardboard box from the edges (as in separate the flaps from the sides and separate each side from the other side) using a cutter.
2. For the shelves use the flap that is the same length as the side you want to use as your racks back. Measure the diameter of your nail polish (note for this try to use the nail polish that has the biggest diameter) and add 5 mm to the measurement; cut the flaps using those measurements. Using either tape/ glue (using a hot glue gun) stick the shelves to the board.

3.a. If you want support for the front of the shelve use the flap that is the same length as the shelves; for this I used 'lengths of the shelves' X '1cm' (see image bellow). b.) For the corners use the length of the edges by 2 cm.

4. Tape/ glue the edges, and corners to the back of the board. It should look like a rack.

5. Cut pieces of newspaper for the paper mache.
6. Make the paste for the paper mache. For this step I know there are various methods of making the paste but I used white glue and water (this is what I'm most comfortable with). The ratio that I used for the paste is 3/4 white glue to 1/4 water. Mix the paste using paint brush.
NOTE: From step 7 - 9 place some old newspaper or plastic bags underneath the rack so you don't mess up your bed/floor.
7. Apply the paste on both sides of the newspaper pieces (that your cut in step 5) and apply it on your rack (the one you build in step 4). Allow it to dry before applying the next layer. Note: when applying paper mache I usually apply the pieces of paper horizontally once and vertically the other time around for total of 6 layers (3 times horizontally and 3 times vertically).

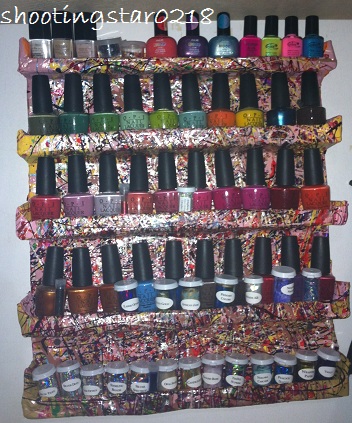
9. Apply 2 layers of acrylic paint (make sure to apply thin layers otherwise the acrylic paint might crack) on the entire nail polish rack. Once the acrylic paint is dry you can create designs on the rack or apply 1 layer of paper mache paste over it to make it shinny. For my wall racks once the acrylic paint was dry, I splattered old nail polish (that I was going to throw away) on the entire rack and allowed it to dry for 2 days. The final product:


Cost:
- $1 for the white glue (I bought it from Dollarama)
- $0 cardboard boxes (you can get them for free from most grocery stores like Food Basics, No Frills, Loblaw and etc).
- $0 to $0.75 for the newspaper (I used old newspaper that was lying around my house, but you can buy the Toronto Star for around $0.75)
- $0 to $1 for the acrylic paint (I had acrylic paint from before but if you want you can buy it from any dollar store)
- $0 to $2 for the nail polish (I used old non-branded nail polish for this, but if you want you can always try dollar stores or beauty outlet stores that have non-branded nail polish for $0.50 per bottle)
TOTAL COST: $1 to $4.75 (it only cost me $1 because I had most of the stuff lying around my house).
I have already started making another nail polish rack for my OPI nail polishes because the one I made before doesn't hold that many nail polishes. Also, I use a spice rack for my Zoya polishes.

Hope you enjoyed my post for today. If you liked it or hated it let me know in the comment or reaction section below. Also, if you want to see a video tutorial for this let me know in the comment section bellow.
Amazing! :)
ReplyDeleteVisit my blog and become a follower if you want :)
minelakahrimanovic.blogspot.com
glad you like it :-)
Delete